Table of Contents:
The VD guide has been updated to version 1.30.5
Description of all the settings available in the Virtual Desktop application for VR headsets and in the Virtual Desktop Streamer for PC.
In this article you will find a description of all the settings available both in the Virtual Desktop application version 1.30.5 for the VR headset, and in the streamer for PC (Virtual Desktop Streamer). All settings are described in full, so the article will be useful for both beginners and those who have been using this application for a long time. You will definitely learn something new.
Since the release of Air Link – a free alternative to wirelessly connecting Quest headsets to PCs, Virtual Desktop has seen a lot of changes. Also, the appearance of Steam Link from SteamVR clearly did not go unnoticed by VD developers.
Such a number of free competitors affects the quality and quantity of features in the paid Virtual Desktop for the better. For us, VR users, this is undoubtedly good, but we also need to understand the new possibilities. So let’s get started.
PC application for streaming. Virtual Desktop Streamer
Selecting the desired codec. HEVC, H.264 or AV1
The difference in the selected codec is not described on the main Virtual Desktop site , but developers often explain this topic on Reddit. Using information from developers and personal user experience, we can come to the following conclusions.
These codecs differ in compression algorithms and final file size. Files compressed in HEVC are noticeably smaller in size, but it takes more time and resources.
Indeed, when using HEVC in a Virtual Desktop streamer, the latency for encoding and decoding increases, as well as the amount of PC resources consumed. However, this format puts less load on the communication channel with the router and allows you to transmit a higher quality picture at a lower bitrate than with H.264.
To summarize, here are the scenarios for using codecs:
- HEVC – to save traffic, sacrificing latency and PC resources. The use is quite reasonable with a not very powerful Wi-Fi router.
- HEVC 10-bit – potentially capable of preserving the best picture when encoding/decoding (except AV1), best reproduces colors. But it requires even more video card resources than HEVC.
- H.264 – Saves PC resources, reduces the delay when encoding the stream. However, image artifacts are possible at low bitrates, in which HEVC will perform better.
- H.264+ – an advanced version of H.264 with an increased maximum bitrate to 400 Mb/s. Of course, to realize all the advantages of this codec you need the most modern router.
- AV1-10bit is a new codec in Virtual Desktop that was introduced for the Quest 3 headsets. It is the best option for this headset. Unfortunately, at the moment only the Quest 3 is capable of using this codec.
When choosing a codec, there is also one more aspect to consider. Since the H.264 series codecs are faster, they are better suited for dynamic games like driving simulators. HEVC and HEVC 10-bit, on the contrary, perform better in leisurely games like HL:Alex and those with a lot of dark scenes.
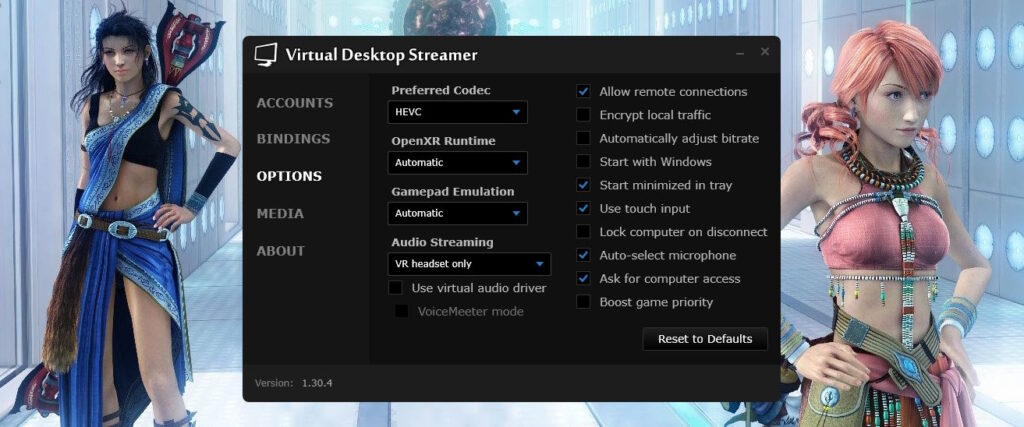
Virtual Desktop Streamer settings
Preferred Codec – select the desired codec for encoding on a PC and decoding the transmitted image in the headset. The difference in codecs is described above.
OpenXR Runtime – OpenXR is the main environment for running VR applications. Some users use apps like OpenComposite to emulate OpenXR and run games without SteamVR. This allows for improved gaming performance. For some time now, VD has received support for its own OpenXR. However, if you are running games through SteamVR when using Virtual Desktop, then there is little point in changing this setting. You only need to change this setting to VDXR if the VR game can work without SteamVR or Oculus software.
Gamepad Emulation – VD is able to emulate regular gamepads using VR controllers. In this setting you can select a specific type of gamepad to emulate.
Audio Streaming – allows you to select the audio mode.
- Computer only – the sound will be played only on the PC.
- VR Headset Only – the sound will be muted on the PC and will only be played in the headset.
- VR Headset and Computer – the sound will be duplicated on the PC and in the VR headset.
- Use virtual audio driver – sometimes audio playback devices on a PC do not automatically switch to drivers from Virtual Desktop. If this happens, you can try to correct the situation with this setting.
- VoiceMeeter Mode – allows you to use the VoiceMeeter application for additional software control of audio streams.
Allow remote connections – allows or denies remote connection to the streaming application.
Encrypt Local Traffic – if you are afraid that someone will spy when you look under a character’s skirt in a VR game, then this is the setting for you. Allows you to encrypt all traffic between the headset and PC.
Automatically adjust bitrate – as well as choosing a codec, a very important option. Allows you to transfer bandwidth control (bitrate) to Virtual Desktop algorithms.
As a rule, in most cases the maximum bitrate is set correctly when this function is enabled. But there are times when the automatic setting greatly reduces the throughput and this becomes noticeable only in the game itself, when it turns into pixelated Mario from Game Boy.
You have to check the settings, remove the headset, disable this option, etc. Unnecessary actions are always unpleasant. So we recommend spending a little time on tests, understanding the capabilities of your router and setting the bitrate manually. How to do this will be discussed further in the settings of the VD application itself.
Start with Windows – start the application when Windows boots automatically.
Start minimized in tray – do not show the application window at startup and immediately minimize it to tray.
Use touch input – Use controls from the VR controller or not. The option will vary when using different VR headsets.
Lock computer on disconnect – if enabled, Windows will ask you to log in to your account again when the headset disconnects from the streaming application. Thereby hiding everything that is on the desktop. You will understand why this is necessary, you are already adults.
Auto-select microphone – automatically switches to the headset microphone when connected.
Ask for Computer Access – enabled by default. Shows a notification when a new VR headset tries to connect to your PC.
Boost Game Priority – increases the priority of using the video card for launched games. Interfering with process priorities on a PC rarely ends in anything good. However, you can try to use this option if the game experiences freezes.
Launch Game – Not obvious function, but very useful in some cases. To access it, you need to right-click on the streamer icon in the tray.
Allows you to launch games manually if they are not detected automatically. It can be useful with games such as Skyrim VR. Where, when using mods, you need to run not the game itself, but the executable file. Or, if you use games installed manually and they do not work correctly when launched via a shortcut on the desktop.
Other Virtual Desktop Streamer settings tabs
Accounts – information about already connected Oculus / Meta, Pico and Viveport accounts.
Bindings – keyboard shortcuts for control from the PC keyboard.
- Switch Monitor – if multiple monitors are connected to the PC, allows you to select the one that should be displayed in the headset.
- Toggle VR Mode – switches between the desktop and the VR application in the headset when VD is running. An analogue of a double, quick press on the system key of the left VR controller.
Media:
- Screenshots – location on the PC where screenshots taken in the headset will be saved (if this option is enabled).
- Video – a folder on the PC with those videos that will be displayed in the VD application with the corresponding section.
About – information with the characteristics of your system.
- Check for Interfering Apps – run a check for applications that may interfere with the stable connection between VD Streamer and VD in the headset.
- Check for Updates – check for updates for VD Streamer.
Virtual Desktop application settings
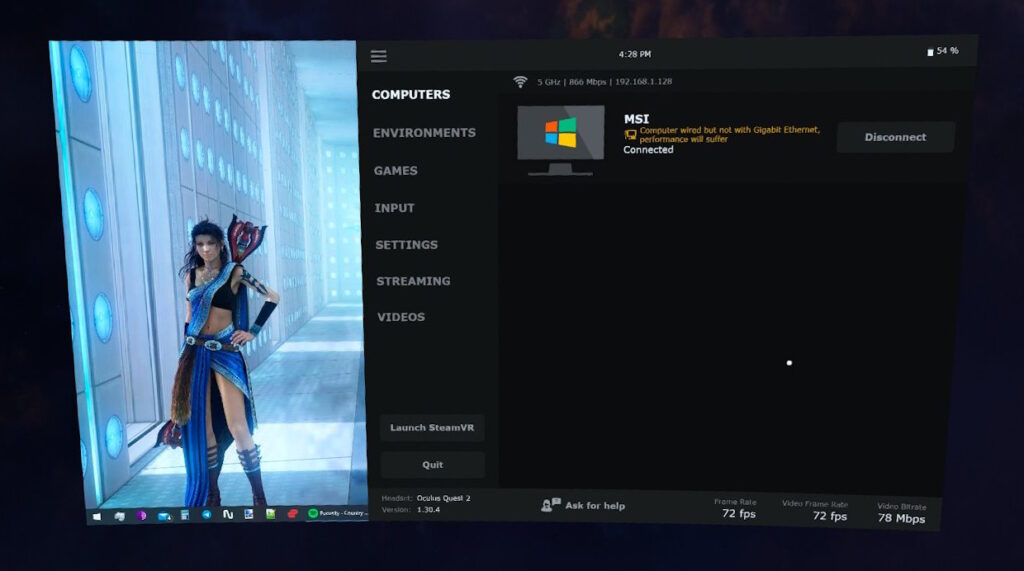
To open this menu, you need to press the “menu” key on the left controller (1 time on the virtual desktop and 2 times in the game), or press the trigger, pointing the cursor anywhere past the virtual desktop.
Computers
Tab with PCs available for connection. The current connection status, channel width and local connection address are displayed here. And also the reasons why the connection may not be available at the moment.
To update the connection status, you need to move the pointer anywhere in the window, pull the trigger on the controller and pull the pointer down.
Environments
Selecting a theme for the environment in the Virtual Desktop working environment.
Games
All games installed officially through Steam or the Oculus / Meta store. If you experience problems with controls or other troubles when launching from a shortcut on your desktop, try launching the game from this menu.
Also, launching applications is available through the menu in the streamer icon on the PC itself.
Input
Settings for your controllers.
Controllers interact with desktop – the ability to use controllers as a mouse cursor on the Windows desktop.
Pointer Stabilization – additional smoothing of pointer movement on the desktop.
Automatically hide controllers – hide the standard display of controllers when starting games or in other cases where it is necessary.
Thumbstick vertical \ horizontal scrolling – use the thumbsticks as a mouse wheel for vertical and horizontal scrolling, respectively.
Hand tracking is a feature for Oculus / Meta Quest. Allows the use of gesture controls if enabled in the Quest settings.
Press Grip to grab / resize screen – allows you to move the VD window in the headset by pressing the grip of the controller. If you click on the second grip at the same moment, you can change the size of the window.
Hold menu to switch out of VR – holding the system key on the left controller will switch the mode from the VR game to the Virtual Desktop window. Analogous to a double, quick press.
Emulate gamepad on PC – allows you to use a gamepad to control games.
- Use touch controllers as gamepad – emulates a regular gamepad using VR controllers.
Emulate D-pad and Start button – settings for emulating the D-pad and Start button of a regular gamepad. Next comes the selection of the conditions under which emulation will be active.
- When right grip is pressed – the gamepad buttons are emulated when the grip on the right VR controller is pressed.
- When right thumbstick is pressed – the gamepad buttons are emulated when the thumbstick on the right VR controller is pressed.
Settings
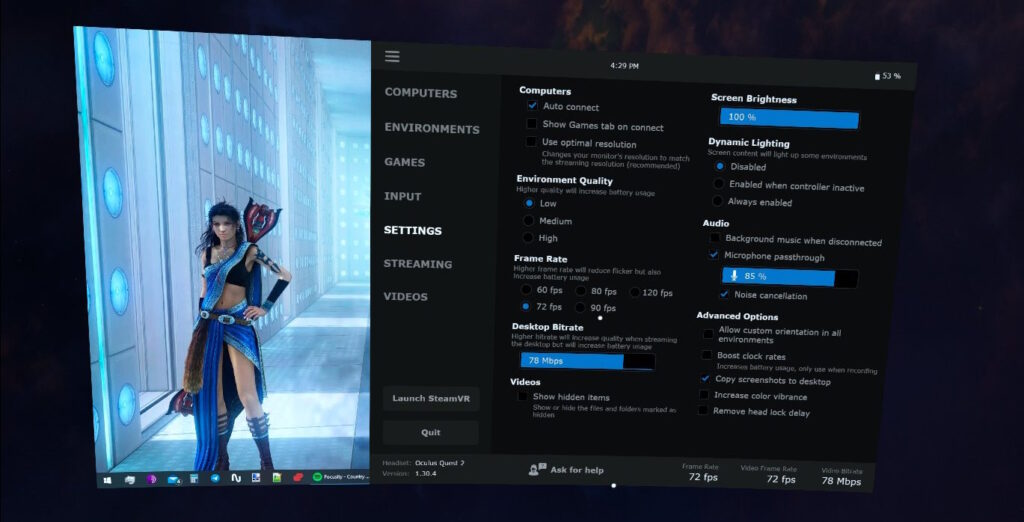
Settings that mainly relate only to how the virtual desktop interface will look when connected.
Auto connect – automatically connect to the Virtual Desktop Streamer application when you launch Virtual Desktop in the headset. If disabled, you will need to manually click Connect on the Computers tab.
Show Games tab on connect – after connecting, the games tab will automatically open.
Use optimal resolution – allows you to control the desktop resolution of your PC using the Virtual Desktop application. If the resolution on your PC desktop changes when you connect and it annoys you, this option is for you.
Environment Quality – control the quality of the virtual space in the Virtual Desktop interface, which is selected in the Environments tab.
Frame Rate – number of frames per second in desktop mode. Does not affect the number of frames when starting the game.
Desktop Bitrate – image quality in desktop mode. The maximum setting value may not be available if the automatic bitrate control option is enabled in the Virtual Desktop Streamer settings.
Videos: show hidden items – if enabled, will display folders and files in the Video tab that are marked as “hidden”.
Screen Brightness – Weather and mood control. Joke. Just adjust the brightness.
Dynamic Lighting – If the virtual environment theme seems too light for you, this setting will make it darker. It will help you concentrate on video in a virtual cinema, for example. Does not affect games. Only for virtual environments.
- Disabled – disabled.
- Enabled when controller inactive – enabled only when controllers go into inactive mode.
- Always enabled – always enabled.
Background music when disconnected – while you are not connected to your PC, a rather nice melody will play.
Microphone passthrough – activate or mute the microphone in the headset.
- Noise cancellation – additional microphone noise reduction.
Allow custom orientation – allows you to freely navigate in those environment themes in which this is not supported.
Boost clock rate – allows you to temporarily increase the frequencies at which your headset operates. Can be useful if the headset’s processing power is not enough for some functions. Video recordings, for example. Increases battery consumption.
Copy screenshots to desktop – copies taken screenshots to the Windows desktop immediately after they are taken. Very comfortably.
Increase color vibrance – allows you to make the colors of the environment more saturated. Customization. Who likes it more?
Remove head lock delay – disables the delay in moving the desktop based on the position of your head if the “Head lock” function is enabled.
Unobvious settings for the Virtual Desktop window in the headset
If you move the controller pointer above or below the main VD window and pull the trigger, additional settings appear.
At the top of the VD window there will be the following settings:

- Head lock – when enabled, the VD window will follow the movements of the head in the headset.
- Transparency – make the VD window semi-transparent.
- Reset View – reset all window position settings.
- Height – window height adjustment.
- Distance – adjusting the distance of the window from the eyes.
- Curve – window crowding control.
- Size – window size setting.
Available functions below the VD window:

- Changing the display mode of a VR stereo pair.
- Switch Seat – change the seat in the cinema (available in some environment modes, such as cinema).
- Switch Monitor – switch between different monitors if you have several of them.
- Keyboard – calls the keyboard directly in the VR headset.
- Menu – opens a menu with Virtual Desktop settings.
Streaming
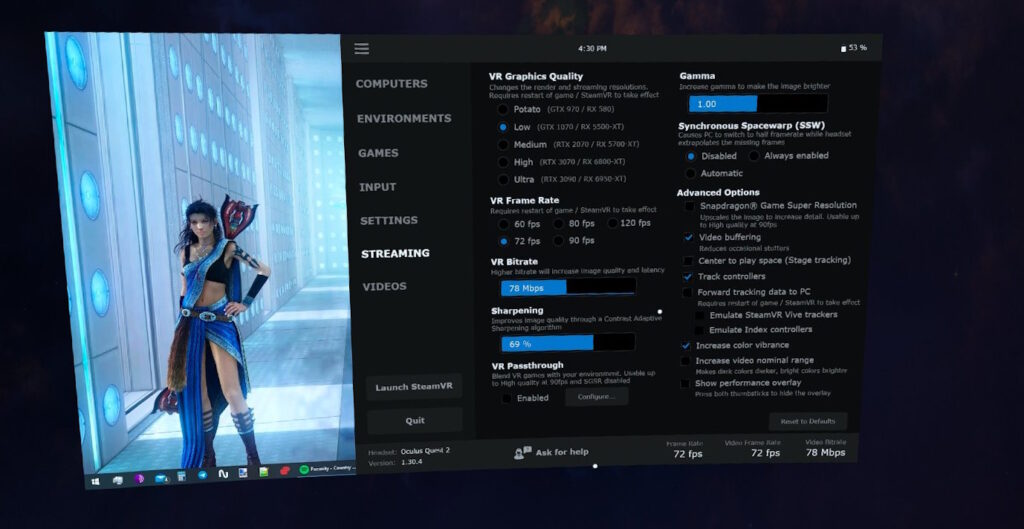
The most important Virtual Desktop settings that directly affect the gameplay.
VR Graphics Quality – adjusts the base image resolution that is sent to the headset. It is this value that will be applied to subsequent SS (supersampling) settings from SteamVR or Oculus.
The main performance setting, which is responsible for image quality and graphics staggering. Resolution is indicated in pixels for each eye separately for different headsets.
Quest
- Potato: 1200×1344
- Low: 1536×1728
- Medium: 1824×2016
- High: 2208×2400
Quest 2/Pico Neo 3/Quest Pro
- Potato: 1440×1536
- Low: 1728×1824
- Medium: 2016×2112
- High: 2496×2592
- Ultra: 2688×2784
- Godlike: 3072×3216 (Quest Pro only)
Pico 4
- Potato: 1488×1488
- Low: 1776×1776
- Medium: 2064×2064
- High: 2544×2544
- Ultra: 2736×2736
- Godlike: 3120×3120
VR Frame Rate – the maximum number of frames that your system will strive for when rendering an image.
It is important to take into account that if it is impossible to achieve the set FPS with hardware, duplicates of already rendered frames will be used. Although these synthetic frames help to slightly correct the picture as a whole, they greatly affect the feeling of “smoothness” of the picture.
For example: if you set it to 90fps, and the game runs at 60 – 70 frames per second, then it will not be as comfortable as if you set it to 60 and 72 frames by default.
It makes sense to experiment with the settings and change the Frame Rate for each game. For example, Beat Saber is much more enjoyable to play at 90fps, although such a Frame Rate is quite difficult to achieve in other VR games and for them, it should be reduced if necessary.
VR Bitrate is the most “creative” setting in Virtual Desktop. Responsible for the amount of data transmitted to the headset “over the air” through your router.
At low values of this parameter, the power of your hardware will not be particularly important – the image will look like a JPEG image with maximum compression. At high values, the delay can catastrophically increase and it will simply be impossible to play due to lags.
The maximum available value for a comfortable game is largely influenced by the power of the router and signal. To a lesser extent – the capabilities of the video card. You will have to figure out what bitrate to play on yourself through experimentation. This will depend on your hardware.
Sharpening – improves image quality using “AMD Contrast Adaptive Sharpening” technology. Works on any video cards, not only from AMD. The developers recommend setting the value to 75%. To turn it off completely, set the value to 0%.
VR Passthrough – uses the headset cameras and mixes the in-game image with the image from the cameras. In the settings of this function, you can select the color that will be replaced with the image from the headset cameras. Does not work if the resolution is set higher than “High”, the number of frames per second is greater than 90, or if Snapdragon Game Super Resolution technology is enabled.
Gamma – brightness setting. Simple and clear. Further more difficult.
Synchronous Spacewarp (SSW) is a technology for generating synthetic frames. Analogue of “Asynchronous Spacewarp” (ASW) from Oculus and “Asynchronous Reprojection” in SteamVR. The most important difference between this technology and analogues is that frames are generated in the headset itself, thereby freeing up PC resources. When this function is enabled, the FPS in the game is reduced by 2 times from that set in VD. The remaining frames are generated by the headset. Has several operating modes:
- Disabled – disabled.
- Always Enabled – always enabled.
- Automatic – the technology will be activated if the FPS in the game becomes lower than set in the VD settings.
From experience using this technology, we can conclude that the optimal scenario for its use is to use the Always Enabled mode at 90 frames per second. Enabling SSW at 60 and 72 FPS makes the gameplay very uncomfortable, and at 120 FPS it makes no sense, since it is better to set the number of frames per second to 60 and not use SSW at all.
Snapdragon Game Super Resolution – is an image enhancement technology that uses the processing power of the headset. When enabled, the headset’s GPU will artificially increase (upscale) the image resolution. Can significantly improve quality, but this needs to be tested separately in each game. Doesn’t work if the resolution is set higher than “High” or the number of frames per second is more than 90.
Video buffering – increases the delay by about 10 milliseconds, but allows you to get a smoother picture. Extremely customizable. Some users can’t play without this option, while others don’t even notice the difference.
Center to play space – if enabled, Virtual Desktop will try to determine the center of the play area on its own. If disabled, the center of the play area will be determined in SteamVR at startup.
Track controllers – if disabled, the controllers are no longer tracked in games.
Forward tracking data to PC – duplicates tracking data for controllers and other devices on the PC.
- Emulate SteamVR Vive trackers – emulates trackers from Vive.
- Emulate Index controllers – emulate Index controllers.
Increase color vibrance – allows you to enhance color rendering in applications. Does not affect desktop mode.
Increase video nominal range – increases the difference between light and dark tones in games. Adds contrast.
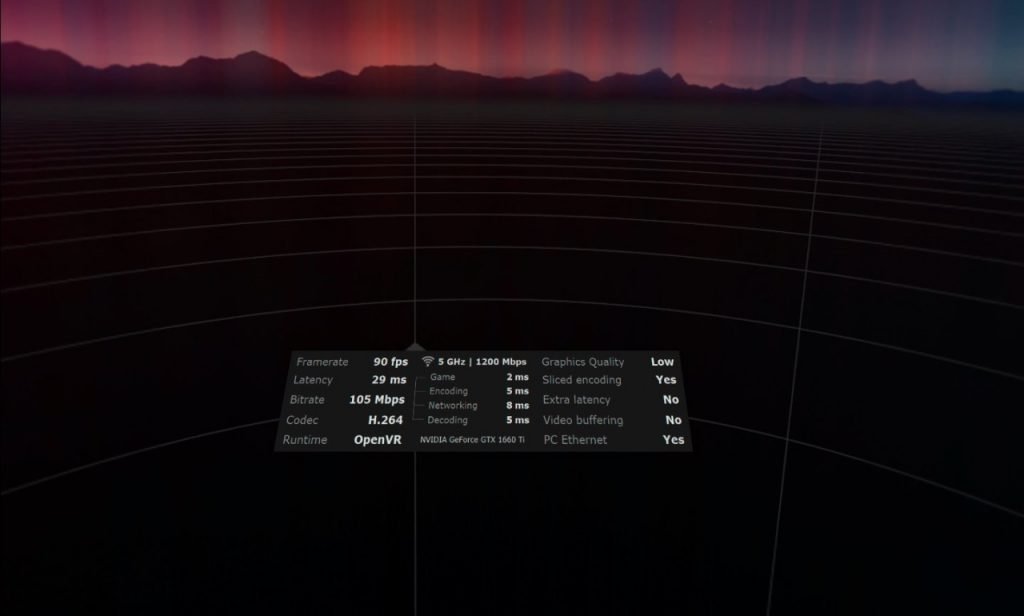
Show performance overlay – includes a window displaying the current FPS, latency and other useful indicators. Quite a convenient tool for adjusting graphics in applications. If you press both controller sticks in the game, this window will turn off.
Video
A section in which all videos located in the Video folder will be available . The location of this folder on the PC is specified in the Virtual Desktop Streamer settings.
It is also worth noting the “ Ask for Help ” button located at the very bottom of the Virtual Desktop window. When you click on it, the voice assistant is activated, to which you can ask any question related to the Virtual Desktop. If you have your microphone activated and have access to the Internet on your PC, then after a while you will receive a response from the AI assistant. For now, only English is supported.
For now, these are all the settings available in Virtual Desktop version 1.30.5. The application is regularly updated and when new features appear, we will describe them in this article.

The Virtual Desktop guide has been updated to version 1.30.5