
Table of Contents:
Find out how to quickly and easily improve graphic quality, readability of text, or improve performance on your Oculus Rift.
Many novice VR users note the poor quality of the image in virtual reality headsets, even with relatively powerful hardware. This is a known issue that is caused by both the newness of the technology itself and the imperfection of the current generation of VR headsets, as well as not quite optimal software or game settings. How to set up the latter will be today’s guide.
It is also worth saying that to improve the graphics, you need a system that has specifications above the minimum required for the Oculus Rift, especially in terms of the video card, since a large load will fall on it. That is, these are cards of the GTX 970/1060 level and higher from nvidia or their analogs from AMD. Graphics-heavy games may require more powerful solutions, such as the GTX 1080/RTX2070 and above.
What is Super Sampling and why it improves the image.
Supersample anti-aliasing (SSAA), aka Full-scene Anti-aliasing (FSAA) is the oldest, highest quality, but also the most expensive type of anti-aliasing (anti-aliasing). It allows you to eliminate the characteristic “ladders” at the boundaries of polygons.
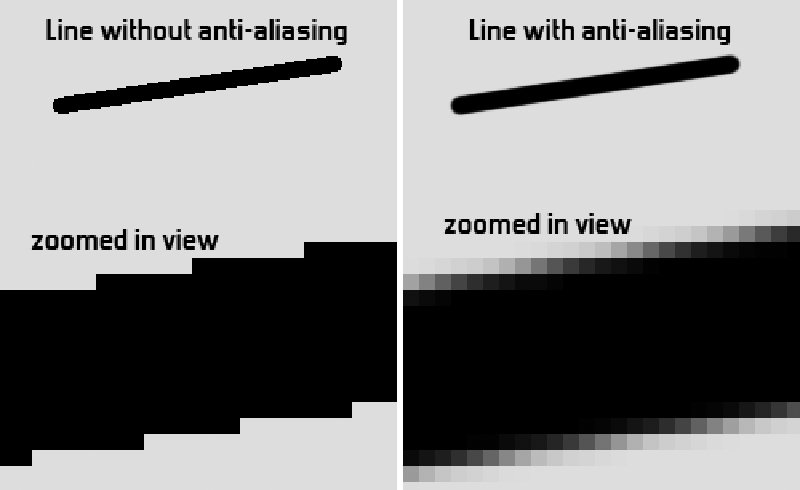
Many modern types of anti-aliasing in VR work extremely poorly, blur the image, but are cheap in terms of performance impact, which is especially critical in VR, where it is very desirable to have 90 frames per second (fps) for a comfortable game and no motion sickness. The use of SSAA improves the quality of graphics (clarity) and readability of text in both desktop and VR games, but in the latter it is more noticeable due to the proximity of displays with relatively low resolution per inch (ppi).
Some VR games already have a supersampling setting in the graphics settings, but this is usually limited to narrow limits and does not allow precise input of the resolution factor. It is only important to note that the final coefficients will be multiplied, which may lead to an unjustified load on the video card and, as a result, low fps, so it is worth changing one thing.
Improved graphics in Oculus API games.
In games and applications running natively through the Oculus SDK, you need to use the native OculusDebugTool utility that comes with the software and is located at C:\Program Files\Oculus\Support\oculus-diagnostics.
Briefly about how to determine if the game is running under the Oculus API: if the SteamVR program does not open additionally when the game is launched, then the game works natively through it. Before running the Debug Tool, you must first connect your headset to your PC and launch the Oculus Home client.
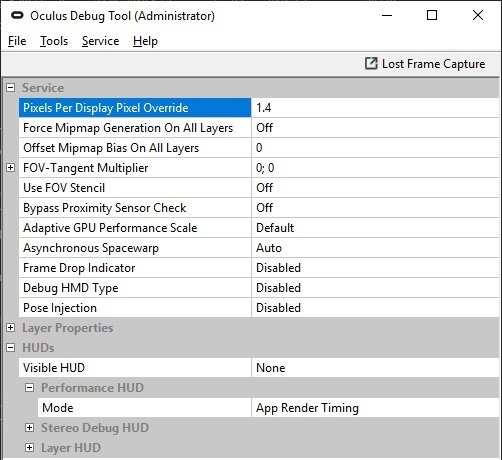
After launching the utility, we see the following window, where in the topmost field called “Pixels Per Display Pixel Override” you need to enter the required value of the rendering coefficient, in the range from 0 to 2 (the video card will no longer pull, and it makes no sense – the visible effect on the graphics will be absent).
By default, there will be 0, which is also equivalent to the entered unit. Values less than 1 will reduce the rendering resolution and worsen the image, but give some increase in fps on weak machines. More than one – respectively, improve. The optimal values for most users are in the range of 1.2-1.5, depending on the power of their video card.
The values are applied in real time and are visible in Oculus Home, for example, but most games require a restart to apply the changes. You can close the utility after setup, but after restarting the Oculus services or rebooting the PC, the values will be reset and the procedure will have to be repeated.
In addition, there is a separate Oculus Tray Tool, which is an extended version of the Debug Tool and written by volunteers. I will not dwell on it in detail, since its functionality in this case is completely similar, there is only the possibility of setting supersampling for each application separately, as in SteamVR and creating a set of ready-made profiles.
Improvement of graphics in games on SteamVR (OpenVR).
In games and applications launched through Steam VR, adjustment is carried out through Steam VR itself – in the settings, in the “Image” tab, just check the “Enable manual resolution setting” checkbox.
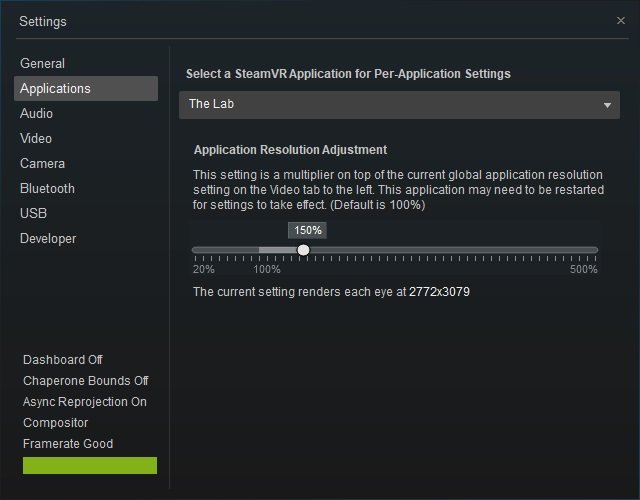
By default, the settings that suit your system will be selected. However, depending on the game and the simplicity / complexity of its graphical component, they can vary widely. Here, in contrast to the Debug Tool, the rendering factor is set as a percentage. In addition, it is possible to set individual settings for each application separately in the “Applications” tab. The final percentages will be multiplied, and the final render resolution for each eye is displayed just below. Optimal values are 140-200%.
It is very important to note that the coefficient set in the Debug Tool will also affect SteamVR – it will take it as the native resolution of the helmet. Therefore, for example, by setting the value to 1.4 there, it makes no sense to change something in SteamVR itself. One has only to make sure that 100% is set there (he can lower it below 100% in automatic mode). The ratio table of coefficients and the final resolution of some values for each eye and the total number of pixels for two screens of the Rift CV1 headset shown below.
| RIFT Debug Tool | SteamVR | Horizontal | Vertical | Total pixels | Description |
| 1080 | 1200 | 2 592 000 | Physical resolution of displays CV1 | ||
| 0.776 | 60% | 1043 | 1242 | ~2 592 000 | Downsampling (lowering) the resolution of displays to native |
| 1 | 100% | 1344 | 1600 | 4 300 800 | Default render value |
| 1.225 | 150% | 1646 | 1960 | 6 451 200 | Optimal minimum value for most applications |

By default, the CV1 renders at a higher resolution to compensate for the effects of lens distortion. Ratios of 1.24 and 1.33 for horizontal and vertical respectively, which equates to a total of 1344 x 1600 per eye (2.150 million pixels).