
Table of Contents:
Find out how to measure your FPS in VR, what it should be and how to know if it’s time to upgrade your PC hardware.
First, a few words about why a stable FPS (frames per second) is so important for VR and why 30 FPS is not enough to immerse yourself in virtual reality.
Film and television standards at 24/30 FPS, as well as games on consoles, where 30 FPS has long been the “gold standard” have convinced many that this number of frames per second is enough for a comfortable game. However, even 60FPS for VR games will not be enough.
Why? It’s all about how our brain works. Without going into too much detail, there are two big differences between playing on a flat screen and playing in VR. If during a normal game an FPS drop occurs, then this will only cause irritation, but in VR any freezes destroy the “immersion” effect, can lead to headaches and nausea (the so-called motion sickness).
In VR, the delay between the user’s action (turning the head / hands) and the displayed change on the screen is primarily important. It should be no more than 11-22 milliseconds, which gives the final 45-90 FPS. Moreover, when the FPS drops below 90 for Oculus, its software starts inserting intermediate synthesized frames (ATW and ASW technologies) to maintain apparent smoothness. Headsets from other manufacturers also have similar technologies.
It would seem that already known and frequently used programs, such as FRAPS, MSI Afterburner (with Riva Tuner) and the like, could be used to measure FPS, however, the specifics of VR makes its own adjustments and such programs can often show incorrect values, or a game / program does not display a window on the desktop at all, where one could see the results, and it is not very convenient to watch them like that, constantly switching between the headset and the monitor.
The simplest solution for viewing FPS in VR games is the fpsVR application that can be downloaded from Steam. But if you are not satisfied with this method, then you can use the Oculus Debug Tool.
Using the Oculus Debug Tool.
For Oculus headsets, one of the main performance measurement tools is the Oculus Debug Tool that comes with the software and is located at C:\Program Files\Oculus\Support\oculus-diagnostics.
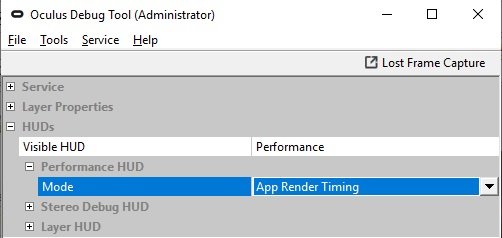
After launching the utility, you need to open the HUDs category by clicking on the plus sign and select the “Performance” item in the Visible HUD drop-down menu.
Now it is enough to put on a headset and the main performance statistics will be in front of your eyes. In order to hide the statistics, you need to select None in the same place. It is worth noting that the given values of 90FPS or 11ms are valid only for the Rift CV1 headset, for the Rift S headset they are equal to 80FPS, for headsets from other manufacturers the values \u200b\u200bmay differ.
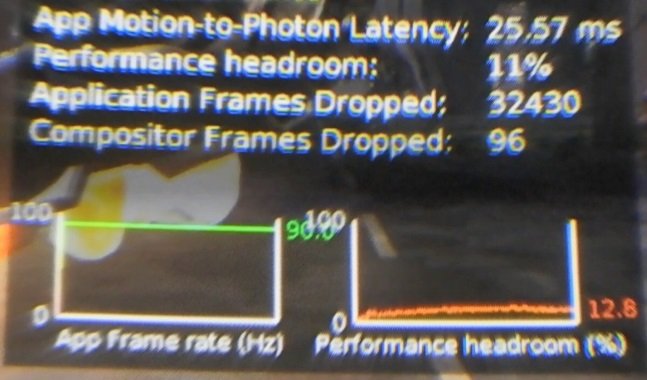
Here, from top to bottom, we see:
- App Motion-to-Photon Latency – delay in ms between movement and displaying it on the screen (less is better).
- Performance headroom – free performance of the CPU and GPU (processor and video card), in other programs, on the contrary, the percentage used is often shown. More is better (this also suggests that it is possible to increase Supersamling).
- Application Frames Dropped – the number of frames that did not fit within 11 ms. If the numbers here are constantly growing, this means that the processor or video card does not have time to prepare the frame in the allotted time.
- Compositor Frames Dropped – the number of dropped artificial frames (synthesized using ASW technology).
- Directly the FPS graph itself, from 0 to 90.
- Graph of “free” performance.
For most users, this information will be enough, however, to determine what is the bottleneck in the system (bottleneck), in the Debug Tool, select “App Render Timing” in the Mode drop-down menu.
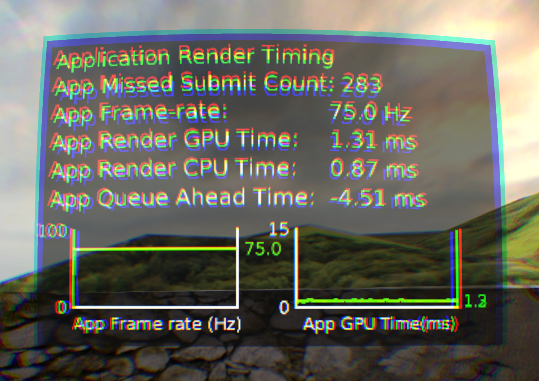
Here, we will be primarily interested in the App Render GPU Time and App Render CPU Time items. The first shows how much time in ms it took the video card to prepare the frame, the second – how much the processor.
Accordingly, if someone does not fit into the limit of 11 ms (90FPS), then he is the “brake”. If this is a GPU, then you need to lower the graphics settings, reduce Supersamling, if it was previously set. If it is a CPU, then first of all it is worth closing all background programs.
If this does not help, you will most likely need to buy a new processor. Or overclock it (for experienced users who are familiar with overclocking). However, often among VR games, especially those made by small studios (indies), there are poorly optimized games where even top-end hardware kneels – poor optimization by developers is primarily to blame here.