
Table of Contents:
In this guide, we will discuss the question that concerns any owner of a virtual reality headset – How to optimize the performance of your hardware in Windows and increase FPS in VR games without using third-party software and video card overclocking.
Using the tips from this article is sure to result in extra frames per second in all your VR games and will become a base that you will use all the time.
Where to start. Displaying FPS in VR games
Any actions to improve performance should be started only when it is possible to check the results of the actions. To do this, you need to enable FPS (frames per second) display in VR game. There are several ways to do this.
SteamVR games: Display performance graph, which is enabled in SteamVR settings or a special app from the Steam store – fpsVR.
Oculus games: enable Visible HUD – Performance in the Oculus Debug Tool app.
Virtual Desktop games: a proprietary overlay for displaying performance. It is enabled in the Streaming settings and is called performance overlay.
A detailed description of all methods for performance mapping in VR games can be found in this article:
Windows settings that you should check first
In this step of improving performance in VR gaming in Windows, we’ll go over the system settings that only need to be changed once. Make sure that all settings are set as indicated in our guide before moving on to the next steps.
Switching CPU priority from background services to running applications
It is important to make sure that system resource prioritization is configured for applications and not background services and processes.
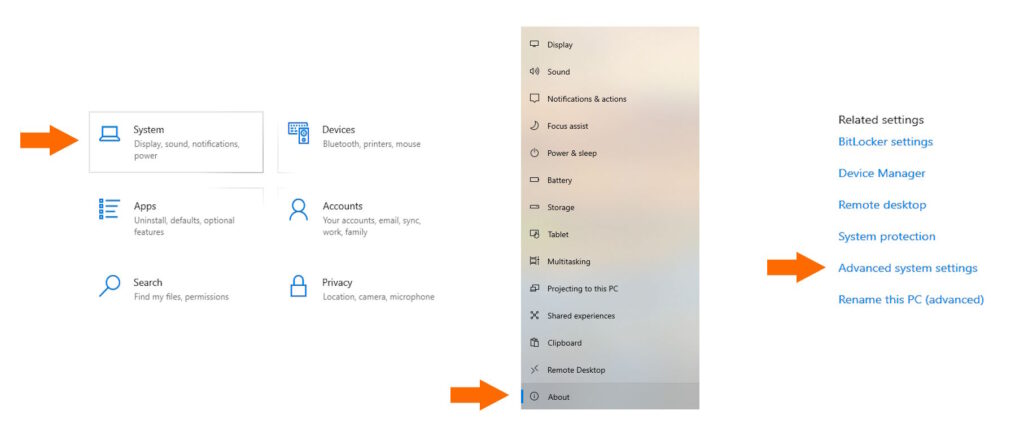
- Click Start, open Settings and in the settings list, click on System.
- In the window that opens, select the bottom tab About and click Advanced System Settings on the right side of the window.
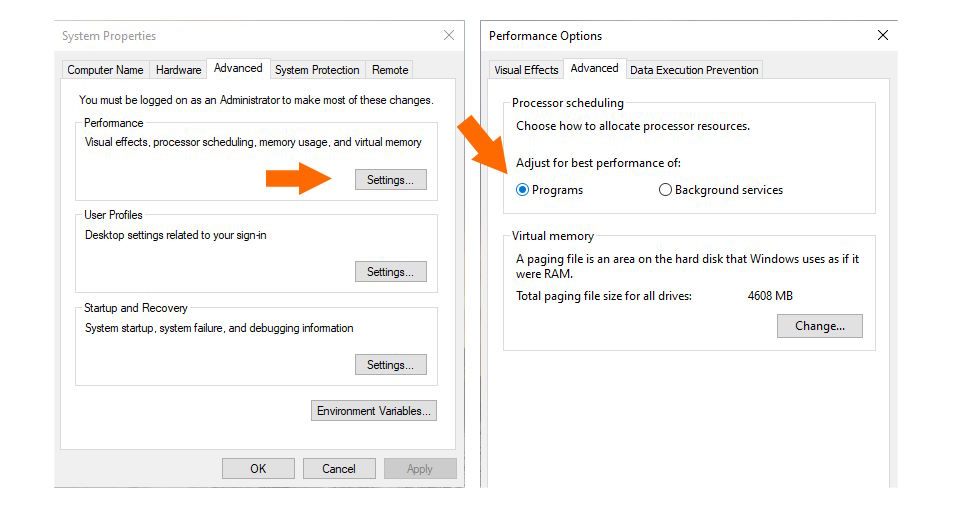
- In the System Properties window that opens, open the Advanced tab and click on Performance Settings.
- In the opened Performance Settings window, also open the Advanced tab and in the CPU time allocation set the selection to Programs. Then save the changes by clicking on Ok.
Windows Game Mode. Disabling Xbox overlay and background gameplay recording
Windows has special features for games that can both enhance their performance and degrade them with additional features.
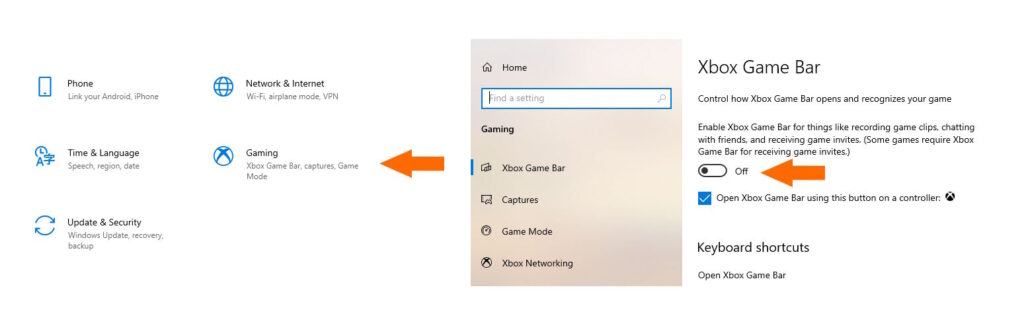
- Click Start, open Settings and in the settings list, click on Gaming.
- In the Xbox Game Bar tab, disable the use of the built-in Xbox overlay if you are not using it. This will help save a little bit of system resources.
- In the Captures tab, make sure to disable the Background Recording feature.
- In the Game Mode tab, enable the Game Mode feature. Here you can also click on Graphics Settings right and make sure that none of your games have Energy Saving Mode set.
Disabling wallpaper changes too often on the Windows desktop
No matter how funny this point of our recommendation for improving performance in VR games may sound, you will be surprised how many users cannot understand why their game “freezes every minute”.
The thing is that when you install a new theme in Windows, the wallpaper change time may change by 60 seconds. In this case, even when playing in full-screen mode, there will be a noticeable decrease in FPS each time you change the picture on the desktop.
- In Windows settings, select Personalization and in the Background tab, check the time of changing the wallpaper on the desktop.
Disabling Windows auto-update. Installing video card drivers correctly
After checking those Windows settings that can be done once and forgotten, you should move on to the next steps. These steps should be repeated periodically to ensure that the software is up to date.
Checking for Windows updates and temporarily disabling auto-update
Windows updates always happen at the wrong time. Every PC user has had cases when a game starts running slower because Windows decided to update.
Updating Windows is essential, but you can save yourself the trouble of performance degradation by doing the following procedure periodically.
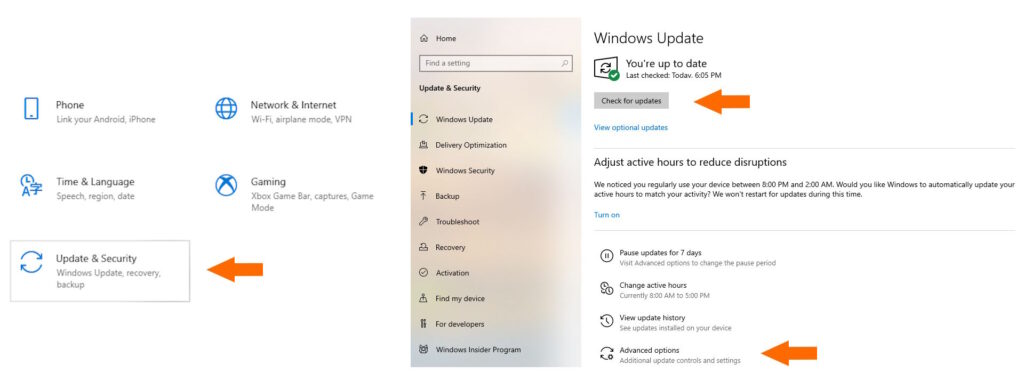
- Click Start, open Settings and in the list of settings, click on Update and Security.
- Click on Check for Updates and install anything required from the mandatory updates. You may have a tab Optional Updates, whether or not to install them is up to you. But, why not.
- After installing all updates and restarting Windows, go back to these settings, click on Additional Options and select the time period for which you wish to disable auto-updates.
Update video card drivers. Clean installation
There can be 3 main problems with video card drivers – outdated version, accumulated errors from past updates, and video driver settings made by the user that he has long forgotten about. A “clean install” will help to get rid of all these problems.
- Download the latest driver version for your video card.
- If the video driver has a “clean install” option, use it. For example, NVidia drivers offer this option if you select not Express but Custom Installation when installing.
- In other cases, you need to uninstall the old drivers first, restart Windows and only then perform a new installation.
Using maximum performance mode for CPU and GPU
Windows has many opportunities to save energy. This is especially true if you are using a laptop. In such modes, the frequencies at which the hardware operates are limited.
CPU: To put Windows in maximum performance mode, you need to change the Power settings.
- Click Start, open Settings and in the settings list, click on System.
- In the window that opens, select the bottom tab Power & sleep and click Advanced Power Options on the right side of the window.
- In the window that opens, select Maximum performance mode.

GPU: The video card driver settings should be set to the same mode of operation. Let’s use NVidia graphics cards as an example, but AMD graphics also have such settings.
- Open NVidia Control Panel, go to the Manage 3D Settings tab, and use the Global Settings window.
- Find the Power Management Mode and set it to Maximum Performance Mode.
- Then find the Texture Filtering setting and select Maximum Performance.
- Remember to save your changes by clicking Apply.
Disable Microsoft Defender for VR games to increase FPS
Microsoft Defender is an antivirus program built into Windows. This program protects your PC from viruses and other threats, but reduces the performance of all running applications. VR games are no exception. When running a VR game, Microsoft Defender can consume up to 5% of CPU power and more, to scan the application for malware in real time.
Some people prefer to disable Windows Defender completely because of its high CPU consumption, but we want to offer you another, more reasonable way. Namely, you can add VR games and VR applications to Defender’s exclusions.
Important: add to Windows Defender exceptions only those applications that you downloaded from official sources and in which you are absolutely sure are safe.
Here is what you need to do:
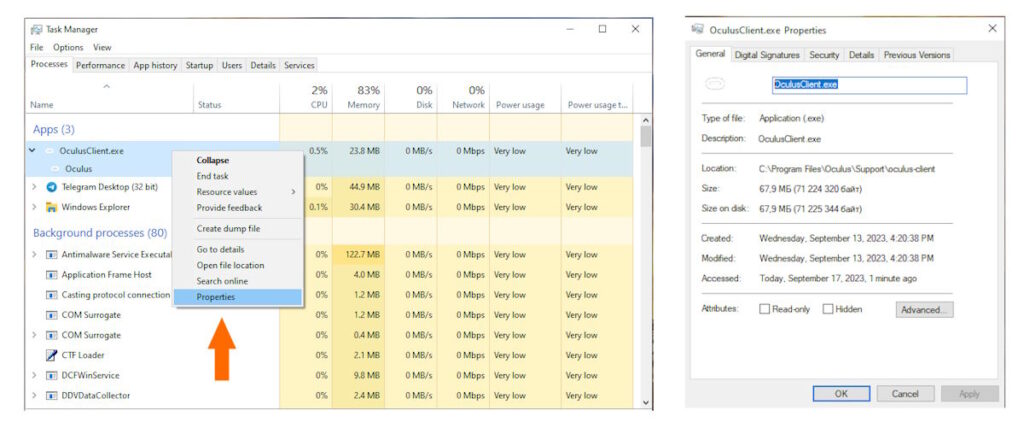
- First you need to find out the process name of the game or application. To do this, launch it and open the application Task Manager via Windows search or by pressing the keys Alt+Ctrl+Delete simultaneously.
- Find the desired application in Task Manager and right-click on it. Select Properties and copy the process name. Note: one process may have several hidden names. In this case, expand the list under the process and copy all names if they are different.
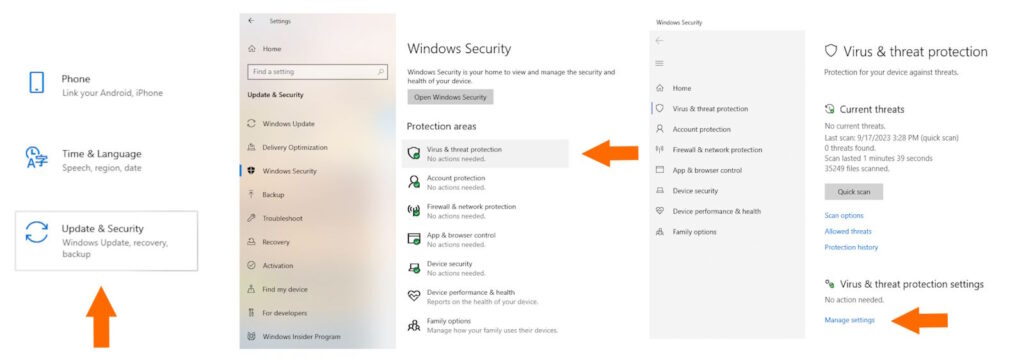
- Next, click Start, open Settings and select Update and Security in the list of settings.
- Select the Windows Security tab and then Virus and Threat Protection.
- In the window that opens, look for the Protection Settings and click Manage Settings.
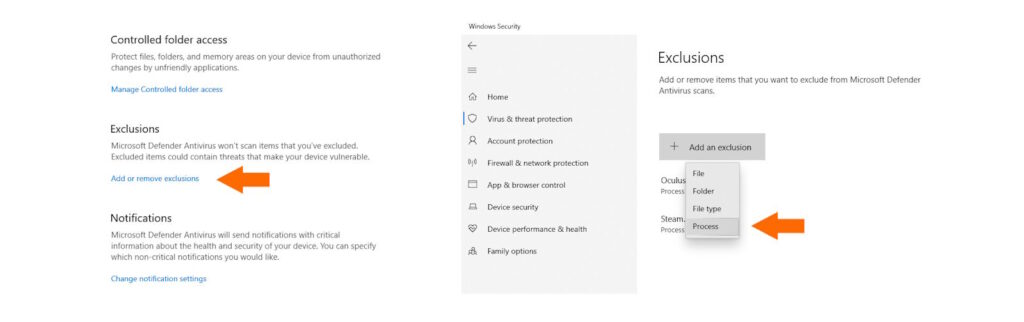
- Next, under Exceptions click Add or Remove Exceptions.
- Click Add Exception, select from the list Process and insert the process name of the application or game.
After adding it to the exceptions, Microsoft Defender will scan this process only at startup, but will ignore it afterwards. To check whether Defender is now wasting CPU resources when the game is running, you should find the Defender process in Task Manager (Antimalware Service Executable) and look at the percentage of CPU it consumes.
We recommend adding VR games themselves, as well as apps from Oculus and Steam, to the exceptions. For official Microsoft instructions on how to add apps to Windows Defender exclusions, please see this link.
Freeing up PC resources for maximum performance in VR games
Now we need to understand what you should do just before launching VR games in order for them to run at the highest possible FPS. These steps should be repeated every time before a gaming session.
The meaning of the tips described below can be reduced to one rule – Only those applications that are necessary for the operation of Virtual Reality should be running on the PC. Everything else should be disabled or consume a minimal amount of system resources.
Shutting down all apps to improve the VR gaming experience
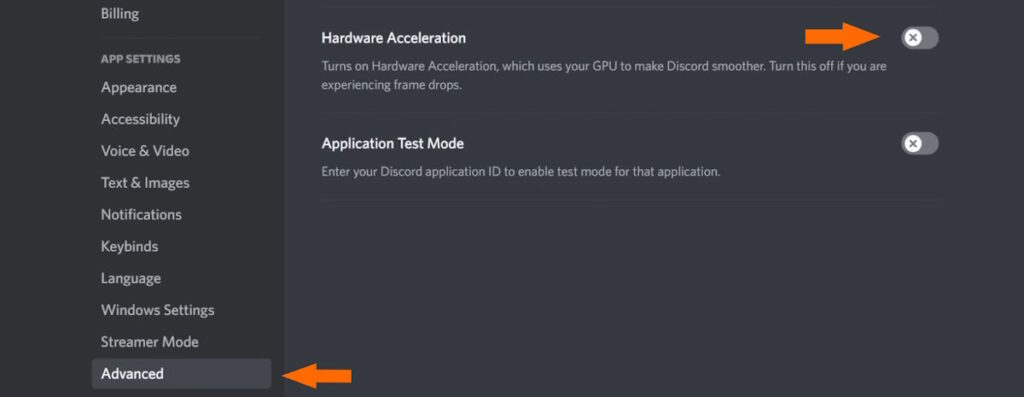
All applications running on your PC consume resources, even when minimized and inactive. And applications such as Chrome browser or Discord messenger use GPU in addition to CPU load when hardware acceleration is enabled.
All these applications should be closed before launching VR games. You should make sure that unnecessary applications are not just minimized to the tray, but completely closed.
If you still need to use Discord for communication when playing VR, it is better to use it on your phone. If you don’t have this option, you should disable hardware acceleration in the settings so that GPU resources are not consumed.
Restart the PC to close all unnecessary processes
What has become the gold standard for us before running VR games with maximum performance is complete reboot of Windows. There are many processes that run in the background and the longer the operating system is running, the more of them there are.
Just try running the same VR games on a freshly launched after reboot Windows and you’ll immediately feel the FPS boost. Simple and effective.
However, it is worth considering that rebooting will not help to disable those applications that are loaded automatically at system startup. You can check for autoloading applications in Task Manager by clicking the Startup tab.
Decrease Windows desktop resolution to increase FPS in VR games
One more “best trick” to help improve performance is reducing the Windows desktop resolution to the lowest possible.
In most cases, desktop screen settings are not taken into account when launching a VR game. The game runs at its native resolution for the VR headset anyway. However, it does duplicate the image on the monitor screen and this can be affected by the desktop resolution.
The fewer resources the CPU and graphics card have to spend on rendering both the Windows desktop itself and duplicating the image from the VR headset, the better the performance will be in a VR game.
The VR game window should be the only one and active
After restarting Windows and running the minimum necessary software for VR (Oculus, SteamVR, VD, etc.), minimize these windows. Even better if tray them, because after minimizing them to the tray, Windows starts to consider such processes as background processes and spends less CPU time on them.
When the game itself is running, you should make sure that its window is in “focus” and is an active process. To do this, you should click on it with the mouse.
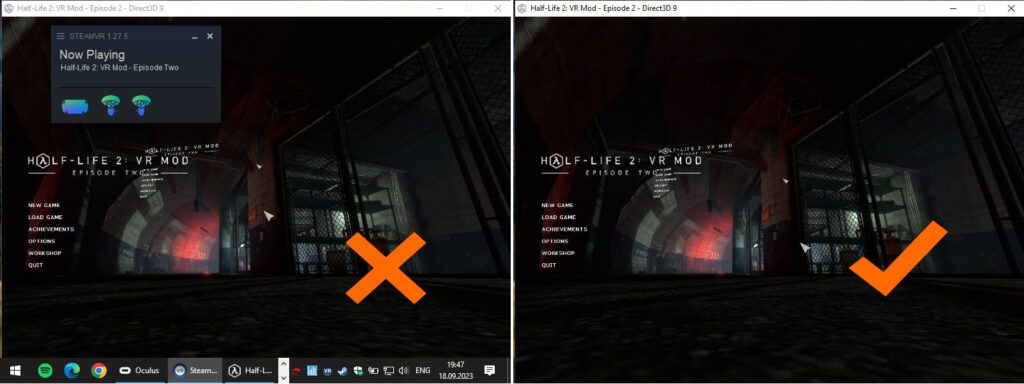
The vast majority of VR games will activate FPS limitation mode if the game window is not the main window at the moment. For this reason, it is very important to make sure that the game window is on top of all other windows, even if the game is running in full screen mode.
A brief summary of all the ways to increase performance in VR games
There are many tips in this article to improve performance in VR games for Windows, but most of them only need to be done once. After checking Windows Game Mode settings, updating and customizing drivers, disabling all power saving features and adding VR games to Windows Defender exceptions and other items, you only need to do a few things before launching the game.
- Rebooting Windows
- Changing the desktop resolution
- Launch necessary VR applications and minimize them to the tray
- Launching a VR game and checking the activity of its window
Using the tips in this guide will definitely change your experience with virtual reality gaming for the better! If you know other, effective ways to improve the performance of VR games on Windows, be sure to share them in the comments.