
Table of Contents:
First steps on the virtual reality platform from Steam – SteamVR. We will tell you how to install, how to use and how to configure SteamVR.
SteamVR developers want to make it the largest desktop VR platform for virtual reality headsets. This application is the central platform for the distribution of VR games and social events.
If you are starting out with virtual reality, sooner or later you will come across SteamVR, which is essential for getting the best experience in using VR devices. Here’s what you need to know about SteamVR and how to use it.
What is SteamVR?

SteamVR is Valve’s own virtual reality platform, which is based on the company’s successful Steam, the traditional board game distribution company for PC, Mac and Linux. Since the debut of Steam in 2003, the platform has evolved into an entire ecosystem for the gaming experience. With an extensive gaming network and even its own line of specialized hardware, Steam is the go-to destination for PC gaming.
Hence, with the growing hype in virtual reality – SteamVR is a natural evolution of Steam. Supported by leading PC-based VR headsets, SteamVR is quickly becoming the center of virtual reality in the home.
What VR headsets can be used with SteamVR?

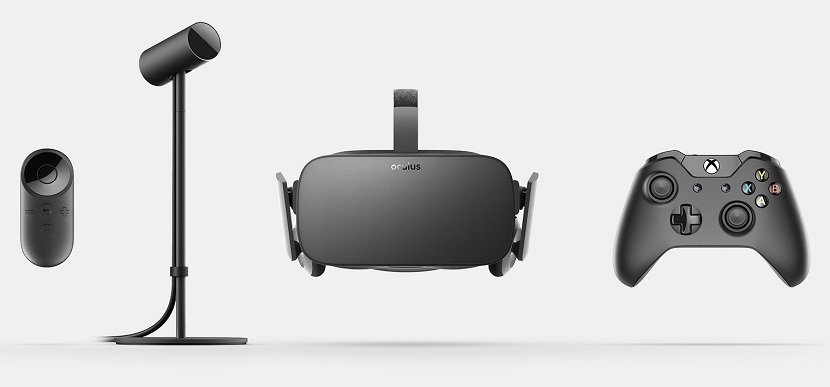
SteamVR has been designed to support the leading custom VR headsets – HTC Vive, Oculus Rift, Quest, WMR and other. Games and apps for all headsets are available through the Steam store, however hardware differences have resulted in the release of exclusive titles.
As a result of a partnership between HTC and Valve, SteamVR also offers a range of features and settings specifically for the HTC Vive. While users of the Oculus Rift and other VR headsets can access most of SteamVR’s offerings, it’s worth remembering that it was originally created for the HTC headset. As such, the HTC Vive is already configured to work with SteamVR, and Oculus headsets need some tweaking to support the platform. These changes can be made through the Oculus app by following the steps in the guide below.
How to set up Oculus Headsets to work with SteamVR
For Oculus headset owners, the first thing to do is set up your Oculus to work with SteamVR (Vive owners can ignore this process).
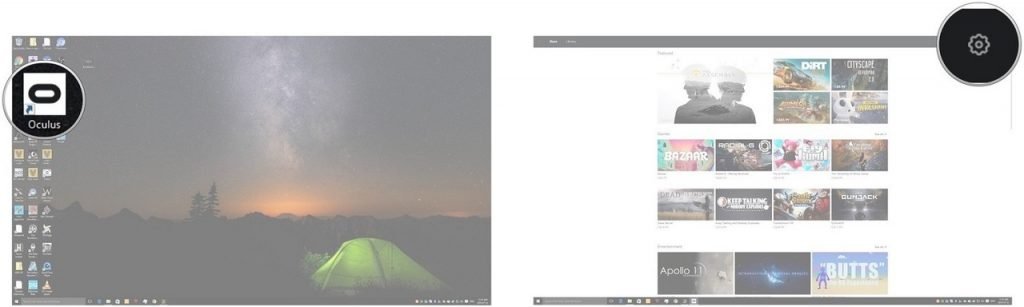
- Launch the Oculus app from your desktop or start menu.
- Click the gear (settings) button in the top right corner.
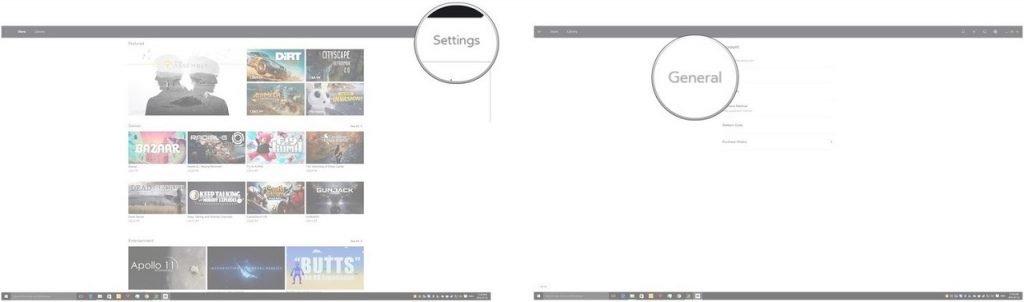
- Click Settings.
- Click General.
- Click the radio button next to Unknown Sources so that a checkmark appears.
- Click Allow.
You can now use Rift with SteamVR and your Steam game library. Note that on an Xbox controller, pressing the back button will bring up the SteamVR menu.
Getting started with SteamVR

Once your VR headset is set up and ready to use, you need to install SteamVR. Redistributable as an extension to the regular Steam desktop client, SteamVR can be easily installed using the following steps.
- To use SteamVR, you first need to install the Steam client. If you haven’t already, follow this link – store.steampowered.com/about/
- After connecting a compatible VR headset, you will automatically be prompted to install the SteamVR add-on. Follow the instructions on the screen to complete the installation.
Note. If you are not prompted to install SteamVR after connecting your headset, you can start the process manually in the Steam Client Tool Library.
Using SteamVR
Once SteamVR is installed, you’re almost ready to dive into your first VR adventure! It remains only to take a couple of steps:
- Find the VR icon on the client’s Steam desktop.
- Click it to launch SteamVR.
After that, you can put on your VR headset to see the SteamVR virtual shell. From here you can browse your library and run any VR app.